In 2001, on a Comenius outdoor learning course in Sweden, I had the opportunity to try felting. It was a disaster. I managed to dye my wool using fresh young birch leaves and carded it reasonably well. But the felting process was my failing.
I returned home, my enthusiasm was undaunted. I found a local person who was passionate about dyeing wool and roped her into a felting project. Alas, the wool the children had collected from the fences and fields was unsuitable. The woman kindly brought along her own wool and plans were put in place to create seating mats…and then I moved to another school!
Fast forward several years and as part of my Churchill Fellowship I visited several Swedish Outdoor Nurseries. At one, I noticed there were felted outdoor seats. I thought this seemed sensible and sustainable. The seats are incredibly warm and light. They are easily rolled up or folded and make a beautiful addition to the whole excitement of taking children outdoors.
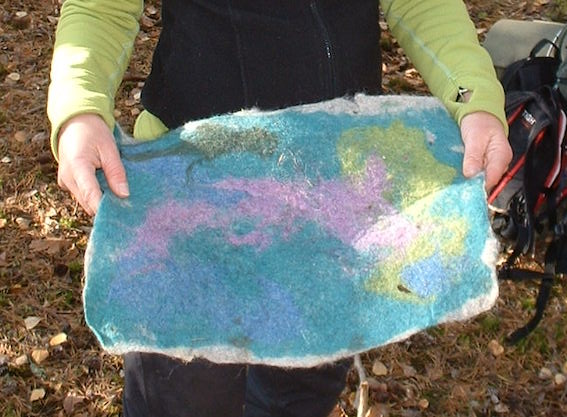
I found a starter felting pack in a nearby craft shop, it felt like a timely opportunity to have another go. I blogged about this back in 2010. This blog post is an update to this original one. It’s a slightly different technique and includes all the lessons I have learned through my own experimentation and doing the 100 Felted Seats Project.
General advice
Practice makes perfect. If you wish to make seats with children then practice making a few in advance until you’ve got the hang of it. I’ve made these with older children – Y6 and older. With very young children, consider making pre-felted patches that are merged together to make a bigger seat. I have blogged about this approach here. Extra adult help is brilliant. Ask for parent volunteers. You may even want to train them first and let them keep their own seats.
Start with a simple project. Learning how to make a felted ball is a good opportunity to introduce how felting works and what is happening to the wool. Making felted stones is ideal for most ages and many abilities. It also means that as a teacher you learn how to manage your class or a group when doing this. You can also get the children to make mini felted squares simply as coasters or little wall hangings. Follow the instructions below but reduce the size drastically to one quarter of the size – or even smaller!
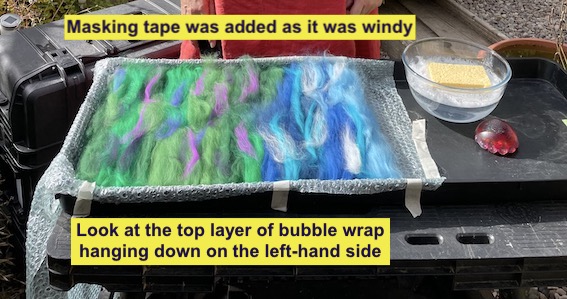
Work in a sheltered spot. The wind will make the laying down of the fibres tricky. I add masking tape to hold the bubble wrap in place. But once water has been added, working outside avoids a lot of mess and slippery floors. One option is to start inside to prepare your seat and then move outside after the water has been added and the mat is safely rolled up in bubblewrap.
Learn from experts. There are lots of videos online that show you the art of wet felting. Every professional has their preferred approach. However, there are only 5 things you need to felt: the wool, soap, water, warmth and friction. Bear in mind, children have less strength and concentration than many adults.
Plan thoroughly
- Get everything ready in advance.
- Go slowly. Allow at least 2 hours to complete.
- Go step-by-step and issue instructions one at a time. Get children who complete each step to help others in the group. Encourage everyone to support each other.
- Model the process. It may be worth asking a child who is finding the activity “not their thing” if their seat can be used this way. Get them to help others, or take photos of what is happening, check the water temperatures and other jobs.
- Until the final roll-squeeze-knead process, do not move on to the next step until everyone is ready.
- Down load the instructions as a pdf. Yes! Here it is! 🙂
- Check out the video (scroll down the post or look here) – with thanks to Joyce Gilbert for being up for modelling the process on her first attempt at making a seat – what a pro!
Double check that none of your children have an allergy to wool. If so, discuss with them and their parent/carer about suitable measures to manage this or suitable alternative activities.
Equipment needed
Wool. If starting out, the easiest option is to go for commercially bought merino tops. It comes in a length which can be unravelled. Budget for at least 100g per seat. You may want a little extra to allow for margins of error as it’s easy to make the seat too thick or thin. There are 3 layers of wool in a seat and 2 of them can be made of white merino wool which is cheaper. Have a look at Wingham Wool and World of Wool to purchase. They offer bulk and trade discounts.
Bubble wrap. Do not purchase if at all possible. It’s plastic and not easily recyclable. But you may well have supplies from packaging or put a call out for donations. I make seats which begin as approximately 36 x 45cm. My bubble wrap is at least 40 x 100cm to provide a top and bottom layer. Sometimes this means taping smaller sheets together. I re-use each piece around 50-100 times – long after the bubbles have popped. I then repurpose the bubblewrap into woven peg loom seats.
Soap. You may prefer to use detergent if your water is hard. You don’t need any special sort other than ensuring they are biodegradable.
Hand hot water. Make this up when you need to use it or keep in a thermos until you do. Young children’s skin is more prone to burning so take great care not to use water that is too hot.
Sponge. A (compostable) sponge to squeeze and drip warm soapy water over the final layer.
A tray. Whilst not essential, this can provide edging to help your children get the size of the seat correct as demonstrated in the above photo. Alternatively a frame of cardboard or something to guide children really helps.
Waterproof gloves. Marigold or similar gloves are useful for any child or adult who may have sensitive skin. Check in advance. Remember to check for latex allergy too! I find they give me a better grip when rolling and felting the wool.
Large, smooth round stone. This is optional but can make the pre-felting easier. It is an adaptation of a felting tool called a “mool“.
The preparation
Set up your working space. A picnic bench can work well or other table. In theory you could also do this on the ground on a tarp but I’ve not tried this. Layout the bubble wrap in the tray, bubble side up. Always stand or sit at the same place in front of your tray.
Unravel and untwist the merino wool tops. Measure out the length of wool needed. It is helpful to do this in advance for children if you are short on time. If you have more than 2.8m per mat you are likely to be making it unnecessarily thick.

Spread the wool out to a similar thickness, with all the fibres laid horizontally on a piece of bubble wrap. Using a dark background is helpful when using white wool.
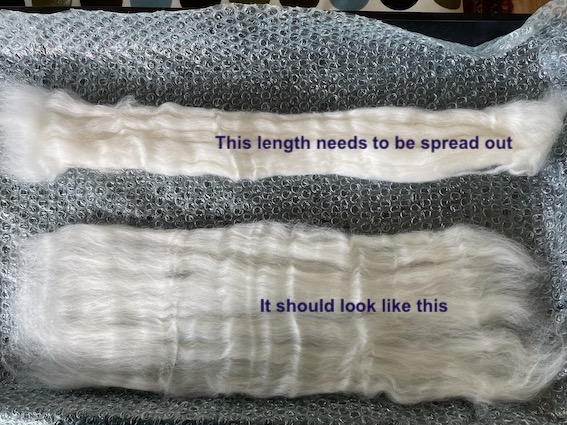
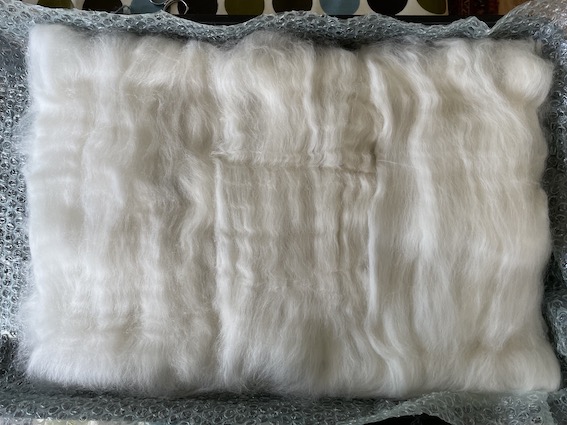
Once one layer of horizontal fibres has been spread out, a second layer of vertical fibres is added on top of this. Remember to spread out the fibres.
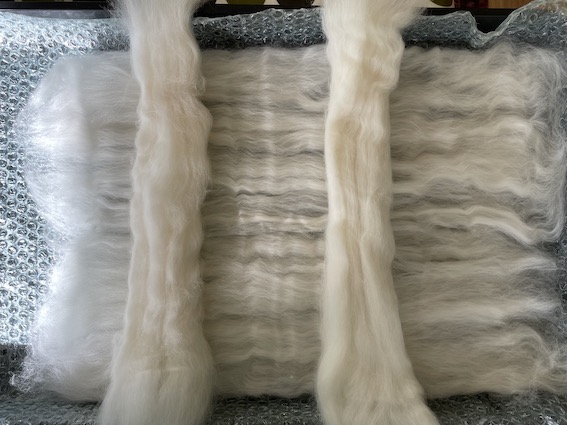
After both layers have been created, the seat should look like this. There should be no “black holes” or gaps in the wool fibres. It should also be difficult to see the separate skeins of fibres – see below:
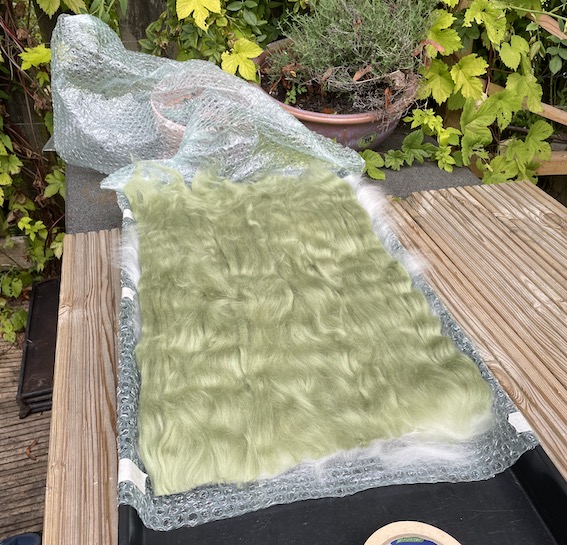
The third and final layer of wool is where colour can be added. The simplest approach is to add the final horizontal layer all in one colour. Make sure all the white wool layer below is covered. By pressing the layers down gently you will see if you have any gaps that need to be covered with a few wisps of wool.
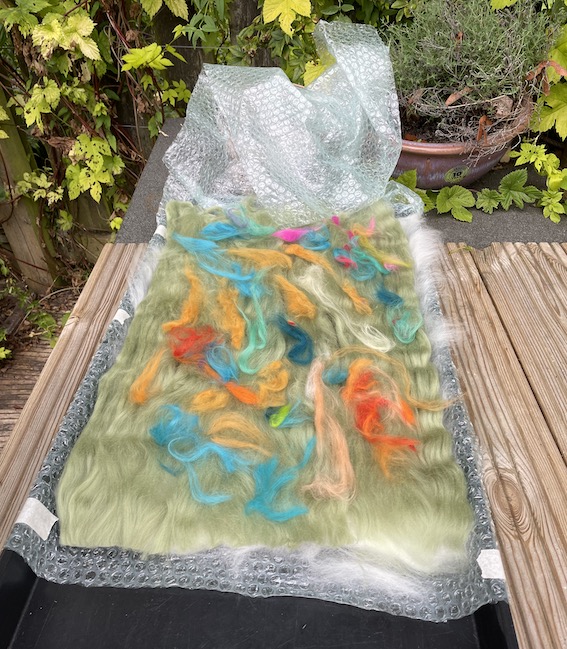
On top of this, you add little wisps of wool. I have a bag of leftovers and little bits and pieces. This stops huge clumps being added by a child. Think of an artist like Jackson Pollock doing felting!
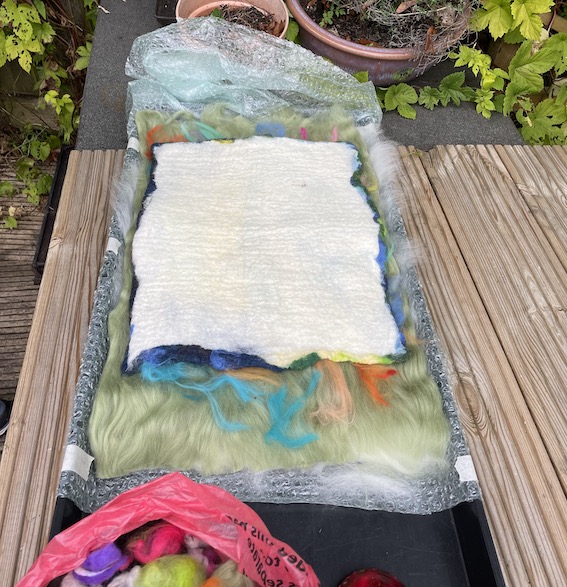
You are now ready to begin the felting process which happens in 2 stages: the pre-felting and the “rolling” which is the full felting. In the photo below I have put a completed felt seat upside down on top. This gives you an idea of how much the seat will shrink during the felting process. In this particular example, the seat is a bit too long. But we fixed that later.
I made a short video to demonstrate some of the steps below that are highlighted in bold, e.g. wetting the felt.
The pre-felting process
Wetting the felt. Pour hand hot water into a bowl. Add a little soap or detergent – the equivalent of what you need for washing up. Give it a stir. Dip the sponge into the water. Hold it above the wool but do not let it touch the wool. Gently squeeze the water out. As you do so, move your sponge in your hand over the seat so that the drips cover the wool. You do not want the wool totally soaked, just wetted.
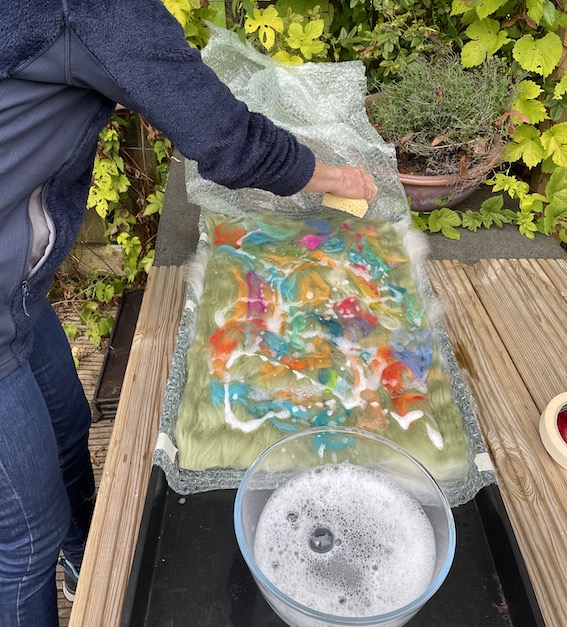
Put the second layer of bubble wrap over the top of the felt. It should “sandwich” the seat – top and bottom.
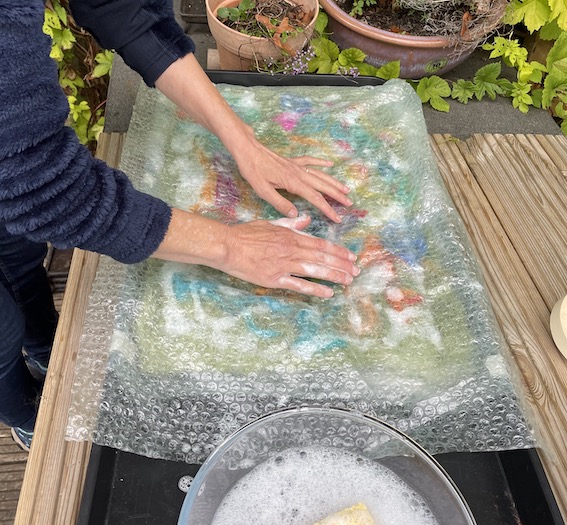
Smoothing the felt. Dip your hands in soapy water to wet them. It makes the smoothing process smoother. Starting in the centre of the mat, very gently move your hands horizontally across the whole of the bubble wrap surface to smooth down the felt below. Take your time.
Rubbing the felt. Next, do vertical motions across the whole of the bubblewrap surface. Finally do clockwise circles all over the bubblewrap and anticlockwise circles. If you prefer, you can dip the large smooth rounded stone in water to do this part of the pre-felting. Do this right up to the sides of the tray.
Next, very gently and slowly, lift the top layer of bubble wrap up.
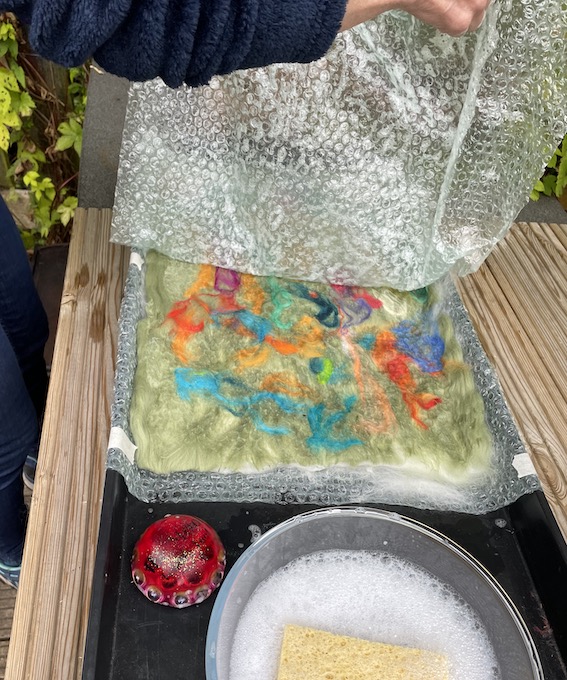
You now need to check the following:
- Is all the felt wetted? If not add more water
- Can you see any “gaps”? These are places where the white under layers are showing through. If so, add some wisps of colour to cover up the white. Then add a drop of water to hold the wisp in place. (See photos below).
- Repeat the step above of covering up the felt with the bubble wrap and rubbing it in all directions with your hands or the stone.
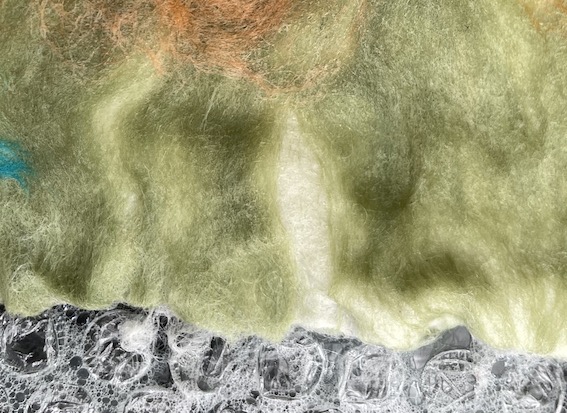
Tucking in the edges
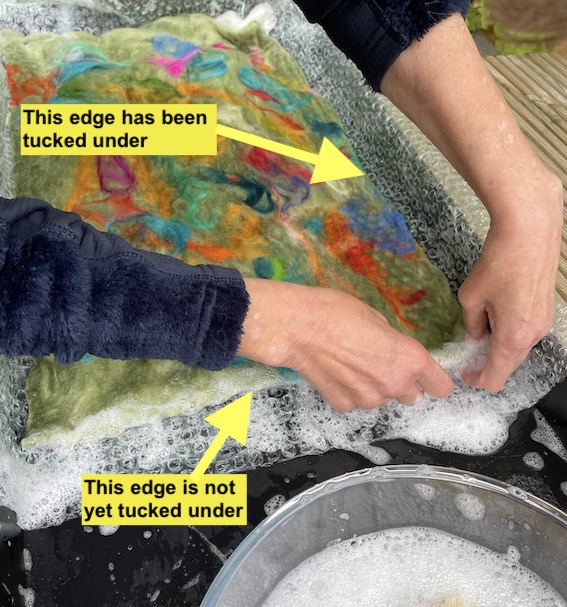
This really helps tidy up the edges. Surprisingly the sides will not become particularly lumpy. It is the most fiddly part of the process and adult assistance may be needed particularly for this part.
Take one edge at a time. Wet the edge with more water dripped from the sponge. Carefully tuck the coloured edge under the white under layers. Cover the edge with bubble wrap and rub gently over the top with your hands or the stone – have a look at rubbing the edges in the video. Lift the bubblewrap up. Move onto the next edge to be tucked in.
The full felting process (where the rolling happens)
Your seat is now ready to be fully felted. This is the most physical part and it is important you work at a height that doesn’t give you back ache. I usually do a karate-style horse riding stanch so my back is straight as my work surfaces are low. You may find sitting easier. Initially it feels like a lot of work. In reality it can be done at speed and with practice can be achieved within 15 minutes. For beginners, allow much more time and breaks in between. Some children and adults may enjoy doing this part to music as a motivation. Wearing kitchen gloves helps as it protects your hands and adds friction. If you have taped down the bubble wrap to stop the wind blowing it, then now is the time to remove the masking tape.
The main felting steps
- Check your felt seat is wetted. You don’t want it soaking but it does need to be wet. Make sure the top layer of bubblewrap is smoothed down over your seat.
- Note which end of your bubble wrap is open and which is closed. This will help you remember the order of felting.
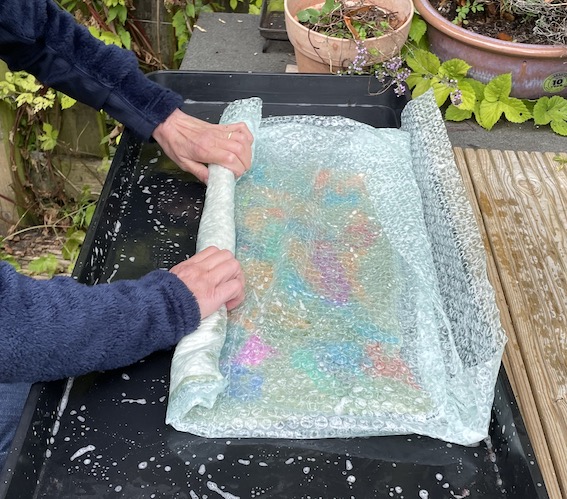
- Roll up the bubblewrap lengthways into a long sausage shape. If it is soaking then squeeze out the water on to a safe place on the ground or back into the bowl.
- Roll the sausage and squeeze it as you do so with your hands. Do not let the sausage unravel. It’s a bit like kneading bread. Do 30 roll-squeezes. Make sure that the entire sausage length is squeezed during this process and the felt stays inside the bubble wrap.
- Unroll the sausage back to the starting position.
- Turn the seat one-quarter turn. Roll up the seat widthways. Do 30 roll-squeezes. Make sure that the entire sausage width is squeezed during this process. Unroll the sausage.
- Turn the seat one-quarter turn. You are now rolling up the seat lengthways but from the opposite side to which you began. Do 30 roll-squeezes. Make sure that the entire sausage length is squeezed during this process. Unroll the sausage.
- Turn the seat one-quarter turn. You are now rolling the seat up from the opposite width to previously. Do 30 roll-squeezes. Make sure that the entire sausage width is squeezed during this process. Unroll the sausage.
- Turn the seat back to your original starting point where it is lying lengthways.
- Lift up the top layer of bubblewrap. Check for any white gaps. Add wisps of fibre and a drop of water to hold them in place. Put the bubblewrap back on top. Rub over the covered wisps in all directions as per the pre-felting process.
Repeating the felting process
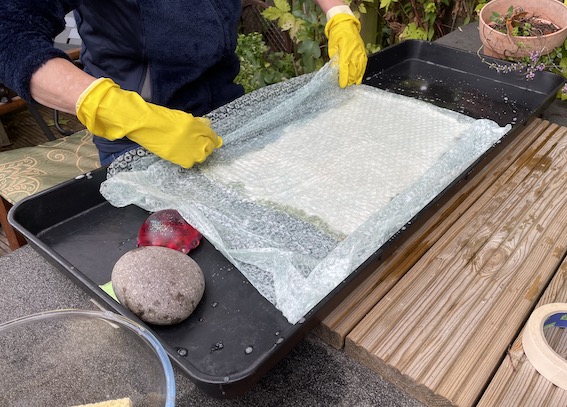
- Turn the seat over – bubble wrap included. The white underside should now be facing up as illustrated in the above photo. Ensure it is covered in the bubble wrap. Repeat steps 4 to 9.
- Turn the seat back over so the coloured side is facing up. You have now completed the first cycle. You now need to repeat steps 4-9 again. Then you flip the seat over, white side up and repeat steps 4-9 again. You have now completed the second cycle. You need to do a third cycle.
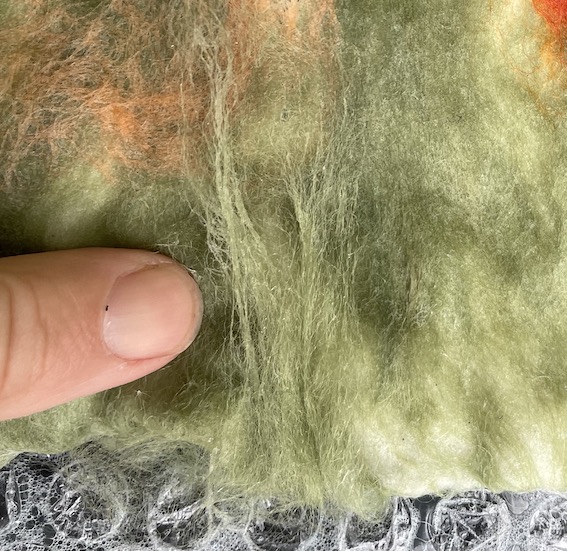
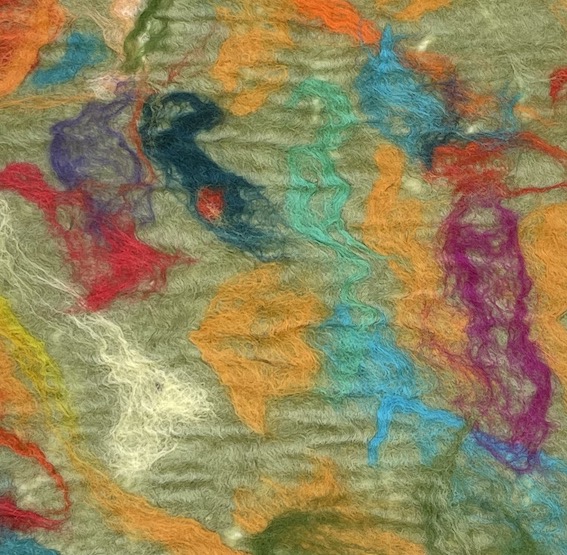
- After the third cycle of rolling and squeezing from all directions on both sides, you need to check your seat. It should have a slightly rippled texture. Examine the colour wisps and gently rub one or two of them. They should not move but feel attached to the felt below. Have a look at the close up in the photo below.
Once the seat is felted
Take the felt seat out of the bubble wrap. Hang the bubble wrap out to dry.
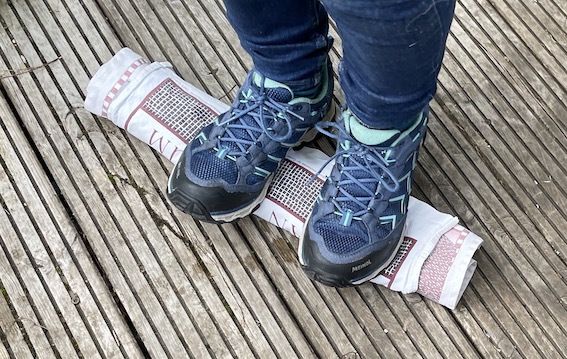
Rinse the seat to remove the soap and to gently squeeze the felt seat dry. This is necessary if your seat is very soapy. Then you put it between two towels and roll it up. Stand on the felt to get the water out. Make sure you step along the entire seat.
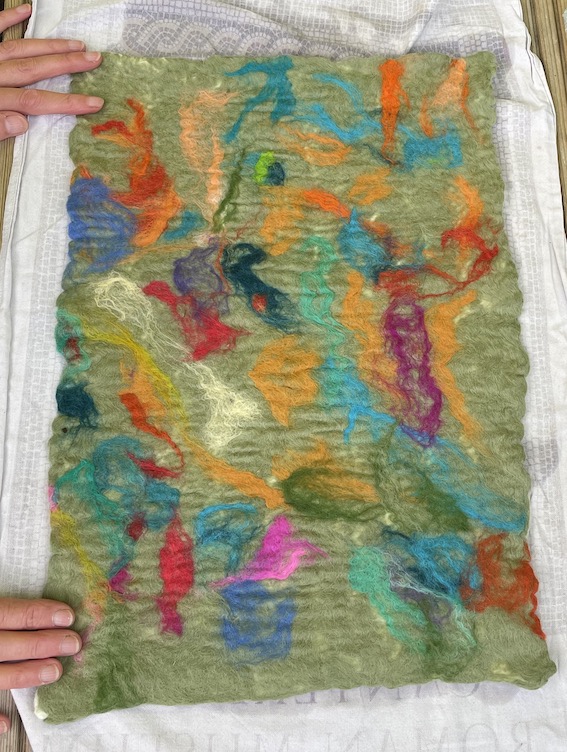
Unwrap your felt seat. If it is looking a bit mis-shapen, you can gently stretch it into the rectangular shape by tugging the edges. If the seat looks a bit too long then pull the long edges out and this will increase the width of the seat and shorten the length. But it needs to be done gently.
Let the felt seat dry naturally – leave in a sunny spot or peg up. If once it is dry, you feel the seat still isn’t sufficiently felted. Then repeat steps 4-9 after wetting the seat with warm, soapy water.
How does this link to the curriculum?
The main emphasis is likely to be through working with textiles. This may include:
- Using a range of tools and equipment. For example, the use of a stone to assist with pre-felting may not have been considered. The use of water, our hands, soap and bubble-wrap are not normally considered tools!
- Developing dexterity, creativity and confidence when using textiles. Felting involves “feeling” your way. It’s better to have a staged approach as recommended at the beginning where balls, stones and little felting mats are undertaken first. Then the repeated experience will give your children a chance to develop their skills and know-how. It also means you can support children to develop their own creativity. For example, the final layer could be a simple landscape. Alternatively you may wish children to experiment with adding pre-felted material, or different types of wool.
- Creating a practical item. The felt seat can be used outside instead of a traditional outdoor seat that is commonly made of synthetic materials. A felt seat can be mended and then eventually composted once it is worn out.
There are also several elements of felting that are worth discussing with your children before, during or after the felting has happened:
- The felting uses wool, a natural fibre that comes from sheep. Show different examples of sheep so they can see that they have different fleeces. Some are suitable for use during felting such as merino, Shetland and Blue-faced Leicester breeds. Not all breeds of sheep have suitable fleece.
- The felting process happens at a microscopic level. Each fibre of wool has tiny scales. When these are locked together, they fuse, shrink and felting occurs. This happens as a result of friction, heat, water and soap. Generally the felting process cannot be reversed.
- Felting is a traditional craft that seems to be universal in societies where sheep or other suitable animal fleeces are available. There have been samples of felted fabric found dating back to 6500BC. It has been used to make clothing, slippers, rugs, bags and other holders. Some yurts are made with felted fibres, e.g. in Central Asia.
- To make wool ready for felting, it needs to be washed, cleaned and carded. This has happened commercially with the merino wool used in this approach. But it is possible to do the whole process by hand. It just takes a lot more time and being able to source the wool. There are hygiene considerations too as raw fleece is greasy and often has clumps of sheep droppings and muck attached.
- Likewise, traditional dyes, mainly from different plants, can be used to colour the wool fibres. This was an art form that was highly valued in previous centuries with processes kept within families and passed on down through the generations.
- RHET have a detailed section of resources on sheep and this is worth exploring particularly in relation to a farming focus or an interdisciplinary project on ways keeping warm! Likewise have a look at The Countryside Classroom.
This post was first published in February 2010. It is a simplified version of the seats I am currently making. Once you have the hang of making a felt seat and practised then it is much easier to be more creative, use native breeds and experiment. For example this blog post, Using gathered wool to make felt gives you an example of a more fancy design using UK breeds of fleece.






I’ve never felted myself, but I remember visiting a school several years ago where a parent had taught the kids how to do it.
The part that has stuck with me is that his version of felting involved driving over it with his car in the parking lot several times! I don’t think he let the kids do the driving . . .
What a novel idea using a car.
I reckon felting is one of those activities, like painting that suits all ages. It’a also possible to make so many different objects too.
I’m now hooked on wool outdoors!
What a fun idea – we have a local resource centre that businesses donate unwanted materials to & I have a box of wool lying waiting to be used. Now I know what to do – watch out for some photos in the future! Thanks for sharing 🙂
Haha! I love the car idea. Wondering how I can run a biking session and felt at the same time….!
Use a zip-lock plastic bag – put the wool in this with hot water and soap. Then attach it to the seat and pedal hard!
I’m going to be messing about with making felt slippers in a similar manner!
this looks beautiful BUT it is very expensive.
It is more expensive than other seating options – there’s no doubt. However there’s some good deals online for merino tops – buy white and use this as the base layers, adding colours on top of this. Also, the way I got into this was through my parents who are friends with people who have heritage breeds of sheep – ones like blue-faced leicester have great fleece for felting – so this also reduces costs.