I visit a lot of schools who like the idea of a compost bin and have one, but in terms of really using it, are a little unsure about what they are doing. The trick is to prepare in advance. Composting is not a spur-of-the-moment activity for a supply teacher. However with a little thought it makes a great project and practical activity for a class.
Firstly, whether you are a teacher, parent or interested person, try and download the Little Rotters Handbook. It has lots of clear information aimed at teachers who wish to introduce a compost system into their school. Sadly the Little Rotters website is no longer live.
Next, it’s perfectly possible to have a “leave it to rot” compost system. This is slow and can be prone to going a little wonky. It’s important to have a mixture of fruit and vegetable peelings going into the bin alongside scrunched up paper and dead plant material such as stalks and stems. Have 3 compost bins going at once. The first bin is filled in term 1, the second in term 2, the third in term 3. Leave the compost in each bin for a year to break down before using. Remember to turn it occasionally or poke it with a stick to keep it aerated.
At home I have 2 systems happening at once. Firstly I have my “dump it” compost bin. This is where I chuck my fruit and vegetable peelings, grass cuttings and garden clippings (green matter) along with a bit of cardboard, straw, shredded paper (brown matter) and any other compostable item Some gardening books will warn you not to add perennial weeds as they will simply grow again from the compost made. Because I tend to use mulch this doesn’t especially bother me.

The real satisfaction comes from my second bin. This is the one which takes more time and organisation but is much quicker and effective. Here’s how it’s done…

First, begin to gather a selection of compostable material. This includes the compostable matter in my “dump it bin”.
Then begin collections of other material. This time I had…
Straw that was part of a postal delivery of some child-size gardening tools.

Shredded paper. I get a real kick out of composting old bank statements!

Dead shrubby material from the winter clearance. My hop plants, dead stalks and plant matter.

Grass cuttings from last year. I hate to throw this in the bin or even take it to the recycling facility. I like the permaculture approach of trying to re-use everything within the garden itself.

The above materials are layered inside the other compost bin. Basically it’s an alternate layer of fruit, vegetable and grass matter with the paper, straw and dead plant material.

I tend to add a few layers of nettles or comfrey to activate the compost bin too. I have low growing comfrey in my garden which is great for adding to the compost heap and keeping the bees happy when it flowers. Finally, adding a piece of carpet to the top, can help too, but it still works fine without this.

A good compost check is to see how it smells and what’s in it. Basically a happy compost heap doesn’t reek. It will have lots of worms and the breakdown process is evident. It will not be too wet or too dry.

In an unhappy compost bin, you might get lots of flies, a bad smell and few worms. After a while you work out which material takes too long to decompose. In my compost bin large fruit stones such as mango and avocado tend not to rot quickly. Egg shell doesn’t either but I just crush this down.

Most local authorities have cheap or free compost bins that have been tried and tested in the local area. However I like the bin below. This was in a Swedish I Ur och Skur nursery. An acetate panel has been inserted so that children can see the decomposition in action. It’s also possible to do a mini compost bin in a plastic bottle. This is a useful activity to create interest and also to send home so that children can explain what composting is to their parents and carers. Instructions can be found through an online search.

Below is the “hot composting” system at Inverary Primary School. The janitor is a keen gardener and oversees this operation. Basically it’s not dissimilar to the layering system, except the compost is turned more easily in these containers.

Again, to have a hot composting process, there needs to be a storage system for waste material so that it can be added in the correct mix and quantities. Inveraray Primary School have a whole shed dedicated to this! Wow!
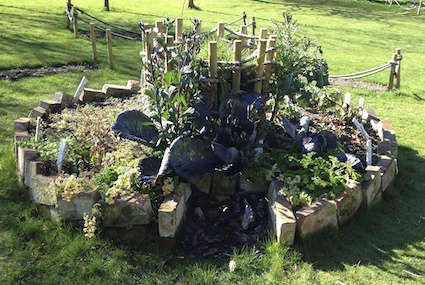
Below, is an example of a keyhole composting system from the Cruikshank Botanic Garden in Aberdeen. The name comes from the design. If you look at the brickwork, there is is a gap which allows you to walk into the centre of the feature and deposit your waste matter into the central compost ‘bin’. As the waste matter breaks down, nutrients and water feed the surrounding raised bed where vegetables can be planted. Lots more information can be found online about this compact method which is common in arid countries but increasingly becoming popular everywhere as it can be made entirely from recycling materials such as old bricks and rocks to create the design.
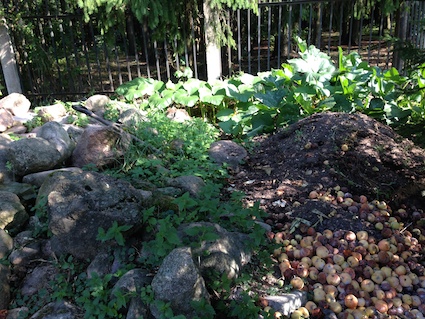
In the corner of the Saules Gojus school in Lithuania, I saw another different approach. The garden waste and vegetables and fruit are put in one dark corner of the grounds. Everything is left to rot down. Melons are planted here every spring so that the compost heap becomes an informal raised bed.
As with most outdoor and gardening matters, trial and error is an important part of the process. It’s a matter of finding the right composting container and system that suits your own and the children’s needs within the climate and setting that you live and work.
2021 Composting Update
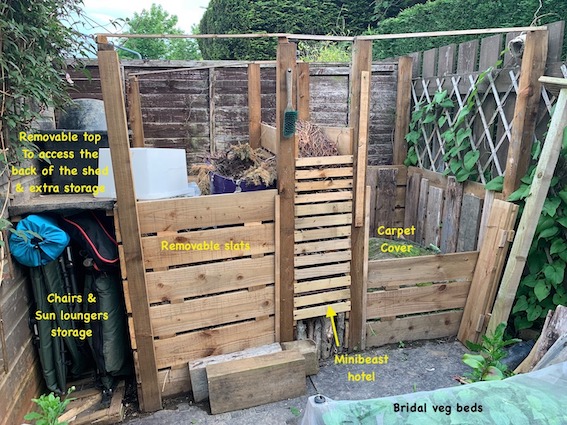
This blog post is old but still relevant. My garden is now totally different and I have a fancy-schmancy composting area made from old pallets and recycle wood that has replaced my local authority bins. There is a gap in between each compost bin which is stuffed with twigs and material for mini beasts to enjoy. I’m finding that it’s taking 2 years for each bin be used – one side being the “dump it” bin and the other being the “rotting down” bin. But the system is working really well and we need very little extra compost on our vegetable and flower beds.
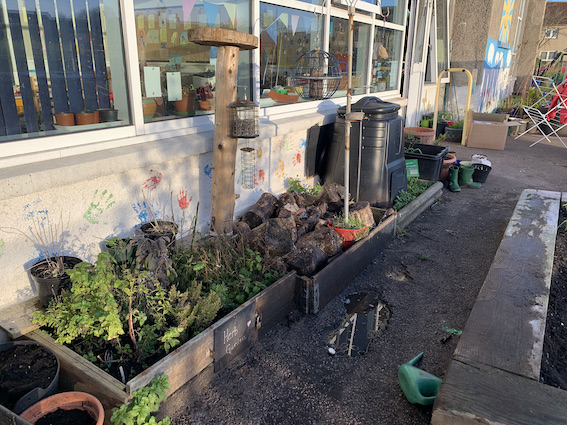
Below is an example of a compost bin at Westpark School Nursery in Aberdeen which is very urban. As you can see the log pile is beside the compost bin and it really does help children make the connection between the two. The main veg growing patch is also nearby. However, it is likely to be moved shortly owing to ensuring that loose wooden items are stored well away from building. Most log piles are inherently damp so the fire risk is small. Likewise, if you choose the “hot composting” methods then very occasionally, a compost bin is known to catch fire. Again, situating your compost bin in a sensible place and adding material in the “cold” way I’ve suggested here tends to mitigate this risk.
This blog post was originally published in May 2011.


