This is a series of wee activities which can be used to focus on the theme of journeys as a context for literacy. The journey begins inside. Use the transition from the class to the outdoor area as an opportunity to develop literacy skills. The activities below encourage children to observe and build vocabulary associated with their school.
For young children
Have children lined up inside the class, each with a cardboard tube, which can be decorated. The adult at the front starts moving the class outside. Whenever he stops and says “Eye spy with my little eye…”, the children have to look through their tube and shout out the name of whatever they see, e.g. “Pegs”, or “Doormat”, or “Fred’s hair”. Make it a rule that the children must find a different object to look at each time they stop.
For older children
In groups of 2 to 4 people link arms. Count 5 paces and stop. Point at the first object you see with your foot and shout out its name (if this is too noisy, whisper). Some rules include:
- You may not repeat a word once you or another person in your group has said it
- You must have your arms linked at all times, even when you get outside
- Have an agreed meeting place outside
Variations
- Point with other parts of your body, e.g. your nose, knee, elbow, etc
- Brainstorm the animals and birds found in the grounds or nearby. Using the list, children decide in their groups which animal they will be and move outside as that animal
- Once outside, gather as a circle. If children are all over the place, call “Quick Circle” and time the children to gather round
- Do a round…”We went outside today and on our way we saw…”
Encourage children to think of variations each time you go outside. For example, the next time, might have a focus on a particular colour, or shape or looking at textures.
Team problem solving activities
Many team building activities involve getting from one place to another. This can encourage children to talk and listen effectively in groups.
For young children
Put out a variety of props. This can be a mixture of gym equipment and loose parts such as wooden planks, bread crates, tyres, a blanket, etc. In small teams the children have to use the props to cross the “river” which is the space between two clearly marked lines or places in the grounds. They must always stay on the props and may not step into the river at any time. If this happens, the child must go back to the beginning.
For older children
- Equipment: Paper plates, flat discs or carpet tiles. Ropes, lines or masking tape to indicate the width of the river.
- Group size: Maximum 10 or 11 in a group.
- Activity: The children are on their journey and come across a big, wide river. Their only option is to try and cross. Give each group about 1/2 the number of plates as there are people. These will not sink into the river. The whole group must cross the river marked on the grass or tarmac. Only one person can be on a plate at a time, and the plates may be picked up and moved. The plates may not slide across the river. They cannot be thrown back to the other side.
The difficulty of this activity can be varied by the width of the river and the number of plates allocated to the group. Obstacles can also be put in the river which the children must negotiate. A time limit or blindfolding a group member will increase the challenge. Likewise, the presence of an alligator can add excitement. An alligator is an adult who will remove any plate that does not have a foot or hand upon it.
If paper plates are used this activity can become significantly more challenging on a day where the ground is wet.
Follow on activities:
This activity has many variations and can be easily adapted by children to meet any fantasy adventure. Think Indiana Jones!
Another similar activity is for children to lay out a simple obstacle course on the ground. Then different children can be blindfolded with others giving instructions as to how to navigate through the “shark infested sea” or “snake pit”.
Micro-journeys
Each child has a 1 metre length of string. Undertake a scenario with the children where they imagine they have shrunk to the size of their thumb. Get the children to lie down on their tummies and look at the place at ground level. If you have magnifying glasses this can help.
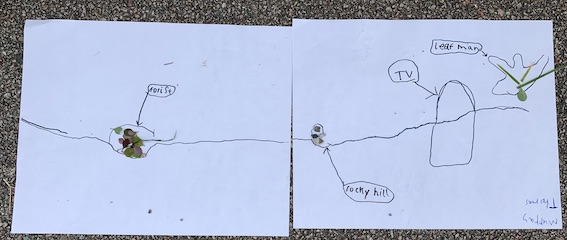
Next the children have to look around their grounds and decide which place would provide a challenging adventure for a thumb-sized person. Use the string to layout the route. Sometimes handing out a pine cone or lolly stick to represent the person can help too, so that each child can walk their mini person through their journey.
After that the children make a plan of their micro-journey. On a piece of card they sketch their adventure. For example, a molehill might be “Swallowed Up Hill” – as there is a risk of the little person being buried in the soil. A large rock or stone, might become a cliff that has to be climbed using a rope and climbing equipment. A puddle might become a lake and need a piece of bark to become a boat to cross it. One option is to provide metre long strips of paper that become a life-sized plan.This story plan can then be photographed and the photo used to write the story the following day: outside or in!
If you have a barren playground with mostly tarmac and grass, take out some nuts, shells, sticks and other materials which the children can also use to their create their adventures. However part of the fun is looking around the grounds for the most exciting micro journey using the features already there.
Journey Sticks
This is a well-known activity that is used for oral story telling and is useful for longer excursions. Each child needs a stick with some wool attached. As the children undertake their walk, they pick up different objects that they find interesting and use the wool to wrap it on or around their stick. Objects that remind the children of a place they liked or something they saw can also be wrapped onto the stick. For example, a feather might indicate a bird they saw. A leaf may be used to remind the child of a tree they sat under to have a snack, etc. At the end of the journey, the children can recall their journey through the use of the objects they gathered.

Outdoor journeys
This was a concept developed in 2008 by Dr Simon Beames to support children and young people of all ages to explore their local environment based upon their own interests and questions. It continues to be a straightforward way of getting immersed into outdoor learning. Have look at the website which includes downloadable templates and more information.
If you have any more ideas, please do share them. It’s nice to have useful collections of ideas around a common theme.
This blog post was originally published in May 2010.









I’d love to create a journey stick with my boys. What a great idea!
Hi Debi
If your boys are quite young, e.g. under 5 then you may wish to have a “sticky walk” instead. This is where you wrap masking tape onto your foot, sticky side out and walk. At the end of the walk, you have a look at the masking tape and see what you’ve picked up to remind you of the journey.
Thanks for the suggestion, Juliet — it’s perfect for my little ones! 🙂
Hi Juliet, I LOVE your blog(which I have found via playbasedlearning blog) – thankyou for all the great ideas, reflections and resources…will visit regularly – Regards
Louise @
http://www.ouyenkinder.edublogs.org