The concept of a right angle can often stump children. After all, surely when any two lines meet, it’s an angle, right?
Using right angle detectors of various shapes and sizes and going on a right angle hunt around a school can be helpful. But past experience is that children jump about from angle to angle without really being sure of what it really is and supervising a class of 30 children to ensure they all get it can be a challenge.
However, once again, I’ve discovered that using sticks seems to help children understand and enjoy learning about right angles in quite a purposeful manner. Last Monday, at 9am, a class of P3 children, armed with sticks and some multilink cubes headed out into the gentle rain to carry out a right angle investigation.
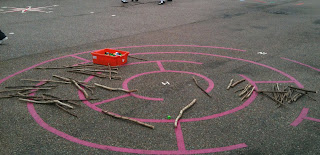
The children worked in groups of four to create a shape or picture that had the most number of right angles they could possibly make. In order to check an angle was “right” a multilink cube was placed in the corner.

We discussed how to make a right angle and check it especially with sticks which are prone to being a little wonky rather than neat and straight.

The children began to see the possibilities. One group discovered that if the sticks were placed carefully together, a second right angle could be created in a corner…
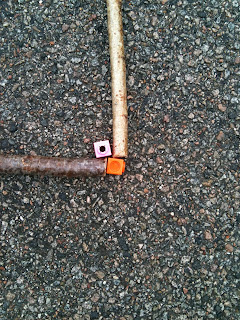
And that if sticks were carefully crossed over each other, then this created four right angles. Aha!

And suddenly the creativity and possibilities multiplied, from basic structures like this…

To this! Wow!

And this! Suddenly, the triangles disappeared!

One group noticed the kilt that a girl was wearing and the right angles within the pattern. They used this as an inspiration…

This led to considerable discussion about who was wearing the most right angles on their clothes! Hmm.
It will be interesting to meet the class tomorrow and see how this activity impacted on their indoor work on right angles. I’ll check with the teacher…as I’ve more outdoor angle work waiting to be tried and tested!












What a good way to present this concept – visual and memorable. I’m a visual learner and to me that activity would have been an asset when I was a kid!
This is so cool! I love the progression in thinking you can see throughout the photos. And using the cube as a right angle “checker” is brilliant.
I, too, am interesting in how this impacted their further thinking and play. Thanks, Juliet.
Yes, I’m so pleased with this activity. The lesson just flowed in the truest sense of the word. We were all sorry when it was over. I’m wondering whether tomorrow to extend the learning to creating 3D shapes with right angles. This would be trickier in that the children will need to experiment with tying sticks together – I’ve got masking tape, wire, foam, washing line and string. So it would be a bit of a design activity too.
Trouble is…nets are a meant to be a level 2 activity. Hmm. Will have to consult their teacher.
What a great way to stretch a concept into a fun, outdoor lesson. I am excited to try this soon! Thank You for sharing. Love your blog!!!
I did this activity with my p1/2 class today. It was fab. The children loved it and totally understood what a right angle is. They were so enthusiastic that I couldn’t stop them pointing out all the right angles they could spot in the dining hall over lunch! We even did an angles dance whilst waiting at the hatch.
love this idea!! I will be using this next week in my outdoor maths lesson! Thank you very much, can’t wait! x
You are welcome – it is a really interesting activity and I love seeing the children explore and discover the best approaches to use. I hope it works well for your class too.
I have trying to think of an outdoor practical activity to show the concept of a right angle for year 2 children. This looks perfect. This would tie in perfectly with the story of ‘The Stickman’ too.
That’s exactly the age range this original activity was undertaken with!