
It’s easy to browse Pinterest and “ooh” and “ah” over the amazing photos that you see of outdoor features in early years settings which seem so with- it compared to yours. This post is from a lovely nursery that I worked with several years ago.
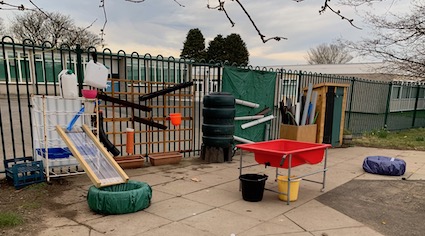
At first glance the above photo is picture perfect. Sadly there’s no children. This is an end-of-the-day after I’ve tided photo of a water play area that is a work in progress. It’s been made mostly from materials that were already available and were at risk of being thrown out.
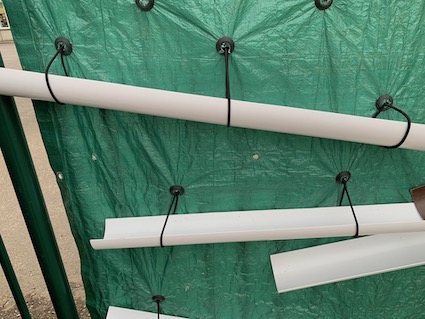
Six months ago the area didn’t exist but in recent months, the staff have each taken ownership of a different part of the outdoor space. The fencing you see is common around Aberdeen City. It’s not ideal for using a a vertical surface but not impossible.
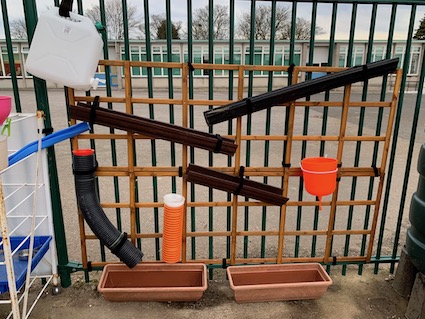
The wooden frame is from a local garden centre. If you look carefully you won’t see a plastic cable clip in sight. I prefer to use Velcro. This means that the structure can be easily changed by staff or children. There is a risk of the items being pulled off the wall but I’ve found only one or two children need to do this and it’s a straightforward process to put them back. The water canister is deliberately attached high up to encourage children to stretch and work out how to switch it on and off using the tap. It also helps save water as it can’t be turned upside and emptied. Plastic window boxes are used to collect the water for this purpose so a little water lasts a long time.
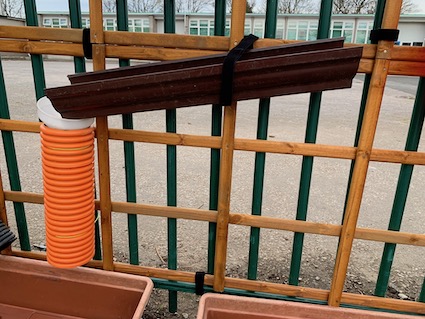
One strap of velcro was used to create a seesaw feature. Every time a child tried this out he or she said “woah”! They did not expect the flow of water to change direction. The guttering is flat-sided on this frame.
The other unusual feature is the orange bucket. This has a spindle plug – when you push it up into the bucket, water is released. It’s a brilliant piece of cheap engineering that helps very young children explore cause and effect. Initially I was worried that it was too simple for the 3-5yr olds. I was mistaken. The challenge of holding a container and pushing the spindle is significant.
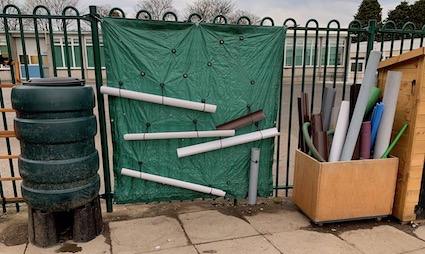
The tarp is a portable water wall which can be set up daily. It’s been made by children using snap ‘n’ tap eyelets. It’s a lovely job to bang them into the tarp in a place of your choosing. The elastic is ball bungees. This area is a DIY space in that the ball bungees enable children to fit their own tubes, pipes and hoses. The aim of this space is to provide a simple area for children to begin to make their own water wall creations. That’s why there’s a stack of guttering, pipes and hoses beside this.
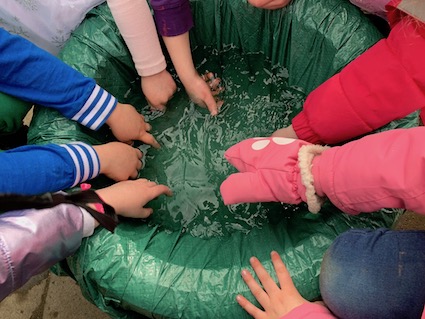
In some of the photos you will see two tyres covered with tarp. These are splash pools and much enjoyed by children. Today the children were estimating their measuring the depth of their wellies and whether it was worthwhile standing in the tyre to find out experientially. Many discussions were also had around how the water felt and whether it was hot or cold water.
So why is it a work in progress? If you look closely, the old trolley shelving unit is quite empty. We still need to add resources into this area. I want to experiment with this tiered construction to see its potential for water falls and more 3D explorations of falling water than a water wall allows for.
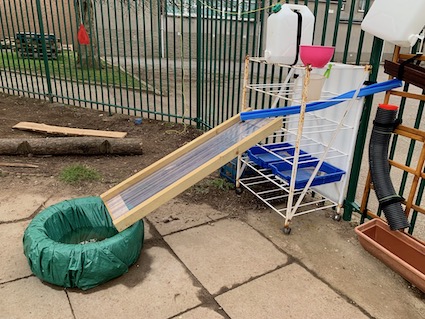
Also I hope it will continue to develop in line with the children’s interests. The children have been fascinated with the water ramp. So there’s a lot of investigations that can lead on from their initial explorations – the addition of bubble wrap: big and small or adding other materials or changing it to a flat sheet. Also there’s so many things to find in the outdoor space that could be used to add in to see it float or move down the channels.
The area also has potential for further expansion. For example, we’ve yet to add in gutting stands to increase the 3D element of the space.
This blog post was originally published in March 2019. The nursery where is is based has continued to further develop its outdoor practice significantly thanks to the ongoing efforts of staff and senior management.


This is cool. In fact my mouth is “watering!”
I am curious, what is on the other side of the fence? Is that another school yard. The reason I ask is because I wonder what would happen with play if tubes were woven through the fence so both sides can be used. That might make for some interesting play if water was poured from both sides, especially if some of the children on either side are hidden by the tarp on the fence.
Hi Tom – the fence is a boundary fence and the ground the other side is part of the community centre. Many years ago I did look at the interplay in another school with similar fencing between the nursery and kindergarten classrooms with water walls and guttering – there’s narrow guttering that fits between the railings. FYI you may have seen your elements being applied to this water area.
Too bad it is a boundary. Although I have found that some boundaries can be used to foster and enhance play, especially social play. I am not sure why, but I do think about it now and then. Until we meet again. Tom
Hi Tom – I think this goes back to your work on flaps, holes and partitions. I’ve been looking back through your posts over the past couple of days and the partitions are fascinating for how they change the social dynamic within a group. Thanks so much for your comments and interest.